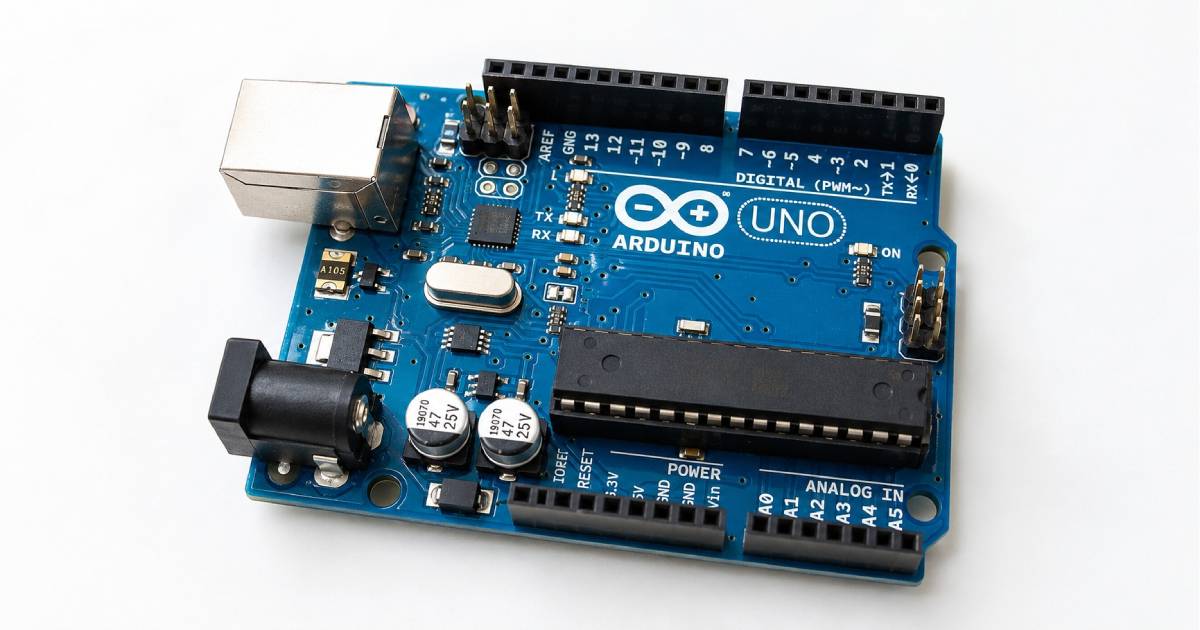
Serial Monitor 與 Serial Plotter 是 Arduino 開發中最重要的資料觀察工具。前者適合查看文字訊息、變數與命令回覆,後者適合將連續數值繪製成即時曲線。
本章以 Arduino Uno R3 為主要環境,說明 Serial.begin()、Serial.print()、Serial.available()、Serial.read()、完整文字命令、CSV 輸出與多曲線繪圖。使用 D0、D1 連接外部模組時,必須留意它們與 USB 序列通訊共用硬體 UART。
學習目標
- 了解 Serial Monitor 與 Serial Plotter 的用途與差異。
- 理解 Baud Rate,並讓 Arduino 與電腦端設定一致。
- 使用 Serial.print()、Serial.println() 格式化輸出資料。
- 使用 Serial.available() 與 Serial.read() 接收字元與完整命令。
- 正確處理 ASCII、換行字元、固定長度 Buffer 與參數驗證。
- 輸出適合人工閱讀、CSV 分析與 Serial Plotter 的資料格式。
- 避免過度輸出、Buffer 堵塞與 Serial 除錯影響程式即時性。
為什麼需要 Serial Monitor?
Arduino Uno 沒有螢幕、鍵盤與圖形介面。程式執行時,若只觀察 LED,很難知道感測器讀值、條件判斷或內部變數的實際狀態。
透過 Serial Monitor,可以顯示感測器讀值、檢查程式流程、查看錯誤訊息、測試通訊資料,也能從電腦傳送控制命令。
int sensorValue = analogRead(A0);
Serial.println(sensorValue);| 項目 | 說明 |
|---|---|
| 中文名稱 | 序列埠監控視窗 |
| 主要用途 | 顯示資料與傳送命令 |
| 初始化函式 | Serial.begin() |
| 輸出函式 | Serial.print()、Serial.println() |
| 輸入檢查 | Serial.available() |
| 讀取資料 | Serial.read() |
| 常用速率 | 9600、115200 Baud |
| Uno 硬體序列腳位 | D0 RX、D1 TX |
| USB 通訊 | 經 USB-to-Serial 晶片連接電腦 |
Arduino Uno 的 Serial 與硬體 UART
Arduino Uno 的 ATmega328P 具有一組硬體 UART,D0 是 RX,D1 是 TX。這組 UART 同時連接板上的 USB-to-Serial 晶片,因此上傳程式與 Serial Monitor 通常會共用同一個 USB 連接埠。
| Arduino 腳位 | 功能 |
|---|---|
| D0 | RX |
| D1 | TX |
資料流程可理解為:ATmega328P UART → D0/D1 → USB-to-Serial 晶片 → USB 連接線 → 電腦 → Arduino IDE Serial Monitor。
使用 D0、D1 的注意事項
- 外部模組可能干擾程式上傳。
- Serial Monitor 可能出現亂碼或資料衝突。
- 電腦與模組同時傳送資料時,可能造成訊號碰撞。
- 上傳程式時可先拔除模組,或改用 SoftwareSerial。
- 需要多組硬體 UART 時,可考慮 Arduino Mega 或其他具額外 UART 的開發板。
使用 Serial.begin() 初始化序列通訊
Serial.begin() 通常放在 setup() 中,用來設定 UART 的傳輸速率。Arduino 程式與 Serial Monitor 的 Baud Rate 必須一致。
void setup()
{
  Serial.begin(9600);
  Serial.println("Arduino started");
}

void loop()
{
}
什麼是 Baud Rate?
Baud Rate 常稱為鮑率或傳輸速率。在一般 Arduino UART 入門情境中,可近似理解為每秒傳送的位元數。常見設定包括 9600、19200、38400、57600 與 115200。
| 設定 | 適用情境 |
|---|---|
| 9600 | 教學、低資料量與相容性優先 |
| 115200 | 大量資料、Serial Plotter 或較高更新率 |
典型 UART 傳送一個字元可能包含 1 個 Start Bit、8 個 Data Bits 與 1 個 Stop Bit,合計約 10 Bits。因此 9600 Baud 的理論上限約為每秒 960 個字元,實際速度還會受到 Buffer、USB 與程式處理時間影響。
Serial.print() 與 Serial.println()
Serial.print() 輸出後不會自動換行;Serial.println() 會在資料後加入換行。多欄位資料應加入欄位名稱與單位,避免只輸出難以辨識的裸數字。
int adcValue = 512;
float voltage = 2.50;
int pwmValue = 127;

Serial.print("ADC: ");
Serial.print(adcValue);
Serial.print(" Voltage: ");
Serial.print(voltage, 2);
Serial.print(" V PWM: ");
Serial.println(pwmValue);| 函式 | 換行 | 適用方式 |
|---|---|---|
| Serial.print() | 否 | 組合多個欄位或在同一行連續輸出 |
| Serial.println() | 是 | 結束一筆資料或輸出獨立訊息 |
輸出浮點數與不同進位
float voltage = 2.45678;
Serial.println(voltage, 2);  // 2.46
Serial.println(voltage, 4);  // 2.4568

int value = 15;
Serial.println(value, DEC);  // 15
Serial.println(value, HEX);  // F
Serial.println(value, OCT);  // 17
Serial.println(value, BIN);  // 1111
十六進位常用於 I²C 位址、暫存器、通訊封包、記憶體內容與位元遮罩。Serial.println(value, HEX) 不會自動加入 0x 前綴,也不會自動補零。
輸出固定 8 位元二進位
void printByteBinary(byte value)
{
  for (int bitIndex = 7; bitIndex >= 0; bitIndex--)
  {
    Serial.print(bitRead(value, bitIndex));
  }
}

byte value = 5;
printByteBinary(value);
Serial.println();
使用 F() 節省 SRAM
Arduino Uno 的 SRAM 很小。固定除錯文字可使用 F() 保留在 Flash,減少字串占用 SRAM。
Serial.println(F("Sensor initialization failed"));控制輸出頻率,避免 Serial 阻塞
若在每次 loop() 中無限制輸出,可能造成畫面快速滾動、傳送 Buffer 塞滿、程式速度下降與其他工作反應變慢。簡單測試可用 delay(),正式程式較適合使用 millis() 控制輸出週期。
unsigned long previousReportMillis = 0;
const unsigned long REPORT_INTERVAL = 500;

void setup()
{
  Serial.begin(9600);
}

void loop()
{
  unsigned long currentMillis = millis();

  if (currentMillis - previousReportMillis >= REPORT_INTERVAL)
  {
    previousReportMillis = currentMillis;
    Serial.print("A0: ");
    Serial.println(analogRead(A0));
  }

  // 其他工作可持續執行
}
Serial Buffer、availableForWrite() 與 flush()
UART 傳送與接收通常使用緩衝區。當程式產生資料的速度高於 UART 傳送速度,傳送緩衝區可能被填滿,Serial.print() 便可能等待可用空間而阻塞主程式。
部分 Arduino Core 提供 Serial.availableForWrite() 查詢傳送緩衝區可用空間。Serial.flush() 在現代 Arduino Core 中通常代表等待已排入的資料傳送完成,不是清除接收緩衝區。
while (Serial.available() > 0)
{
  Serial.read();
}
上例會讀出接收緩衝區的資料,但不應無理由使用,否則可能丟失有效命令。
使用 Serial.available() 與 Serial.read() 接收資料
Serial.available() 回傳接收緩衝區內尚未讀取的 Byte 數量。Serial.read() 每次讀取一個 Byte,回傳型別通常是 int,以便使用 -1 表示沒有資料。
void setup()
{
  Serial.begin(9600);
  Serial.println("Enter a character:");
}

void loop()
{
  if (Serial.available() > 0)
  {
    char receivedChar = Serial.read();
    Serial.print("Received: ");
    Serial.println(receivedChar);
  }
}
字元、ASCII 與數值的差異
在 Serial Monitor 輸入 5,Arduino 通常收到字元 '5',其 ASCII 數值是 53,不是整數 5。單一數字字元可用 receivedChar - '0' 轉成 0 到 9。
if (receivedChar >= '0' && receivedChar <= '9')
{
  int number = receivedChar - '0';
  Serial.println(number);
}
處理 Newline 與 Carriage Return
| 選項 | 傳送內容 |
|---|---|
| No line ending | 不附加行結束字元 |
| Newline | 附加 \n,ASCII 10 |
| Carriage return | 附加 \r,ASCII 13 |
| Both NL & CR | 依序附加 \r 與 \n |
若程式沒有忽略或處理 \r、\n,輸入一次命令可能被誤判為多個命令。
建立單字元 LED 控制介面
const int LED_PIN = LED_BUILTIN;
bool ledState = false;

void setup()
{
  pinMode(LED_PIN, OUTPUT);
  Serial.begin(9600);
  Serial.println(F("1=ON, 0=OFF, t=TOGGLE, s=STATUS"));
}

void loop()
{
  if (Serial.available() > 0)
  {
    char command = Serial.read();

    if (command == '1')
    {
      ledState = true;
    }
    else if (command == '0')
    {
      ledState = false;
    }
    else if (command == 't' || command == 'T')
    {
      ledState = !ledState;
    }
    else if (command == 's' || command == 'S')
    {
      Serial.println(ledState ? F("LED=ON") : F("LED=OFF"));
      return;
    }
    else if (command == '\r' || command == '\n')
    {
      return;
    }
    else
    {
      Serial.println(F("ERROR UNKNOWN_COMMAND"));
      return;
    }

    digitalWrite(LED_PIN, ledState);
    Serial.println(ledState ? F("LED=ON") : F("LED=OFF"));
  }
}
接收完整文字命令
ON、OFF、STATUS 或 BRIGHTNESS 128 都包含多個字元,不能只靠一次 Serial.read() 完成。可使用固定長度 char 陣列逐字收集,收到 \n 後加入 \0,再處理完整命令。
固定 Buffer 可限制輸入長度,較適合 SRAM 有限且需要長時間穩定運作的 Arduino Uno。
const byte BUFFER_SIZE = 32;
char inputBuffer[BUFFER_SIZE];
byte inputIndex = 0;
bool discardInput = false;

void readSerialInput()
{
  while (Serial.available() > 0)
  {
    char receivedChar = Serial.read();

    if (receivedChar == '\r')
    {
      continue;
    }

    if (discardInput)
    {
      if (receivedChar == '\n')
      {
        discardInput = false;
        inputIndex = 0;
      }

      continue;
    }

    if (receivedChar == '\n')
    {
      inputBuffer[inputIndex] = '\0';
      processCommand(inputBuffer);
      inputIndex = 0;
      continue;
    }

    if (inputIndex < BUFFER_SIZE - 1)
    {
      inputBuffer[inputIndex++] = receivedChar;
    }
    else
    {
      discardInput = true;
      inputIndex = 0;
      Serial.println(F("ERROR COMMAND_TOO_LONG"));
    }
  }
}
使用 strcmp() 比較 C 字串
C 字串不能使用 command == "STATUS" 比較內容,應使用 strcmp(command, "STATUS") == 0。
void processCommand(const char *command)
{
  if (strcmp(command, "ON") == 0)
  {
    Serial.println(F("OK LED=ON"));
  }
  else if (strcmp(command, "OFF") == 0)
  {
    Serial.println(F("OK LED=OFF"));
  }
  else if (command[0] != '\0')
  {
    Serial.println(F("ERROR UNKNOWN_COMMAND"));
  }
}
將命令轉成大寫
#include <ctype.h>

void convertToUpperCase(char *text)
{
  for (byte index = 0; text[index] != '\0'; index++)
  {
    text[index] = static_cast<char>(
      toupper(static_cast<unsigned char>(text[index]))
    );
  }
}
解析帶參數的命令
BRIGHTNESS 128 可使用 strtok() 分割命令與參數,再用 strtol() 將文字轉成整數。strtol() 可透過 endPointer 檢查是否完整轉換,比 atoi() 更容易辨識輸入錯誤。
#include <string.h>
#include <stdlib.h>

void processCommand(char *commandLine)
{
  char *command = strtok(commandLine, " ");

  if (command == nullptr)
  {
    return;
  }

  if (strcmp(command, "BRIGHTNESS") == 0)
  {
    char *argument = strtok(nullptr, " ");

    if (argument == nullptr)
    {
      Serial.println(F("ERROR MISSING_VALUE"));
      return;
    }

    char *endPointer;
    long value = strtol(argument, &endPointer, 10);

    if (*endPointer != '\0')
    {
      Serial.println(F("ERROR INVALID_NUMBER"));
      return;
    }

    if (value < 0 || value > 255)
    {
      Serial.println(F("ERROR RANGE_0_255"));
      return;
    }

    analogWrite(9, static_cast<int>(value));
    Serial.print(F("OK BRIGHTNESS="));
    Serial.println(value);
  }
}
parseInt() 與 readStringUntil() 的限制
Serial.parseInt()、Serial.readStringUntil() 與 String 使用方便,適合快速測試,但可能受到 Timeout 影響並短暫阻塞。動態 String 在 SRAM 較小的 AVR 開發板上長時間反覆變動,也可能增加記憶體碎片化風險。
需要非阻塞、可驗證與長時間穩定運作的命令介面時,固定大小 char Buffer 通常更合適。
設計清楚的序列輸出格式
人工除錯適合使用具欄位名稱、單位與狀態的格式;電腦程式或試算表分析則適合固定欄位的 CSV。
| 模式 | 範例 | 用途 |
|---|---|---|
| Debug | TIME=1250 ADC=512 VOLTAGE=2.50V | 人工閱讀與除錯 |
| CSV | 1250,512,2.500 | Excel、LibreOffice Calc、Python 或資料記錄 |
| Plot | ADC:512\tPWM:127 | Serial Plotter 多曲線顯示 |
輸出 CSV
Serial.println(F("time_ms,adc,voltage_v"));

Serial.print(millis());
Serial.print(',');
Serial.print(adcValue);
Serial.print(',');
Serial.println(voltage, 3);
CSV 資料行的欄位數與順序必須保持一致。資料串流中不要混入一般說明文字,否則分析工具可能無法正確解析。
加入時間戳與訊息層級
- [INFO] System started
- [WARN] Sensor value near limit
- [ERROR] I2C device not found
- [DEBUG] ADC=523 PWM=130
使用 Serial Plotter 觀察即時波形
Serial Plotter 會將每一行收到的數值視為新的取樣點,適合觀察可變電阻、溫度、光線、心跳、馬達速度、濾波前後資料與多組感測器趨勢。
| 項目 | Serial Monitor | Serial Plotter |
|---|---|---|
| 顯示方式 | 文字 | 曲線 |
| 適合用途 | 訊息、命令、除錯 | 趨勢、波形、比較 |
| 傳送命令 | 可以 | 通常以觀察為主 |
| 適合格式 | 文字、表格、CSV | 固定數值欄位 |
| 單筆數值判讀 | 容易 | 較不精確 |
| 長期趨勢觀察 | 較困難 | 容易 |
第一個 Serial Plotter 實驗
將可變電阻兩側接到 5V 與 GND,中間腳接 A0。開啟 Serial Plotter 後轉動旋鈕,即可觀察 0 到 1023 的曲線變化。
const int POT_PIN = A0;

void setup()
{
  Serial.begin(115200);
}

void loop()
{
  int adcValue = analogRead(POT_PIN);
  Serial.println(adcValue);
  delay(20);
}
同時繪製多組資料
int adcValue = analogRead(A0);
int pwmValue = map(adcValue, 0, 1023, 0, 255);

Serial.print("ADC:");
Serial.print(adcValue);
Serial.print('\t');
Serial.print("PWM:");
Serial.println(pwmValue);
不同 Arduino IDE 版本對標籤格式的解析可能略有差異。若曲線無法正常顯示,可改用純數值並以 Tab 分隔。
處理不同數值範圍
ADC 範圍是 0 到 1023,PWM 範圍是 0 到 255。兩者直接繪製時,PWM 曲線會顯得較低。可將 PWM 縮放至 0 到 1023,但標籤應明確指出它是縮放值。
int scaledPwm = map(pwmValue, 0, 255, 0, 1023);

Serial.print("ADC:");
Serial.print(adcValue);
Serial.print('\t');
Serial.print("PWM_SCALED:");
Serial.println(scaledPwm);
固定 Plotter 上下限
Serial.print("Minimum:");
Serial.print(0);
Serial.print('\t');
Serial.print("Signal:");
Serial.print(adcValue);
Serial.print('\t');
Serial.print("Maximum:");
Serial.println(1023);
比較原始資料與移動平均
感測器資料常含雜訊。Serial Plotter 可同時顯示原始值與移動平均值,直接比較濾波效果。初始化期間應只使用已取得的有效樣本,避免預設的 0 拉低平均值。
const int SENSOR_PIN = A0;
const byte SAMPLE_COUNT = 10;
int samples[SAMPLE_COUNT];
byte sampleIndex = 0;
byte validSamples = 0;
long sampleSum = 0;

void setup()
{
  Serial.begin(115200);
}

void loop()
{
  int rawValue = analogRead(SENSOR_PIN);

  if (validSamples < SAMPLE_COUNT)
  {
    samples[sampleIndex] = rawValue;
    sampleSum += rawValue;
    validSamples++;
  }
  else
  {
    sampleSum -= samples[sampleIndex];
    samples[sampleIndex] = rawValue;
    sampleSum += rawValue;
  }

  sampleIndex = (sampleIndex + 1) % SAMPLE_COUNT;
  int averageValue = sampleSum / validSamples;

  Serial.print("Raw:");
  Serial.print(rawValue);
  Serial.print('\t');
  Serial.print("Average:");
  Serial.println(averageValue);

  delay(20);
}
取樣頻率與輸出週期
Serial Plotter 的橫軸通常代表資料點順序,不一定直接顯示秒數。若每 20 ms 輸出一筆,近似取樣頻率為 50 Hz;每 100 ms 一筆則約為 10 Hz。
實際週期還包含 analogRead()、格式轉換、Serial 傳送與其他程式執行時間。需要較穩定的取樣時,應將取樣與輸出分離。
const int SENSOR_PIN = A0;
unsigned long previousSampleMicros = 0;
unsigned long previousReportMillis = 0;
const unsigned long SAMPLE_INTERVAL_US = 10000;
const unsigned long REPORT_INTERVAL_MS = 100;
int latestValue = 0;

void setup()
{
  Serial.begin(115200);
}

void loop()
{
  unsigned long currentMicros = micros();

  if (currentMicros - previousSampleMicros >= SAMPLE_INTERVAL_US)
  {
    previousSampleMicros += SAMPLE_INTERVAL_US;
    latestValue = analogRead(SENSOR_PIN);
  }

  unsigned long currentMillis = millis();

  if (currentMillis - previousReportMillis >= REPORT_INTERVAL_MS)
  {
    previousReportMillis += REPORT_INTERVAL_MS;
    Serial.println(latestValue);
  }
}
建立 Debug、CSV 與 Plot 輸出模式
enum OutputMode
{
  OUTPUT_DEBUG,
  OUTPUT_CSV,
  OUTPUT_PLOT
};

OutputMode outputMode = OUTPUT_DEBUG;

void printData(int adcValue, float voltage)
{
  if (outputMode == OUTPUT_DEBUG)
  {
    Serial.print(F("ADC: "));
    Serial.print(adcValue);
    Serial.print(F(" Voltage: "));
    Serial.print(voltage, 2);
    Serial.println(F(" V"));
  }
  else if (outputMode == OUTPUT_CSV)
  {
    Serial.print(millis());
    Serial.print(',');
    Serial.print(adcValue);
    Serial.print(',');
    Serial.println(voltage, 3);
  }
  else
  {
    Serial.print("ADC:");
    Serial.print(adcValue);
    Serial.print('\t');
    Serial.print("Voltage:");
    Serial.println(voltage, 3);
  }
}
Plot 模式應保持每一行都是一致的數值格式。Debug 模式才加入說明文字。Serial Monitor 與 Serial Plotter 一般會占用同一個序列埠,通常無法同時開啟。
串流控制與命令回覆格式
持續輸出大量感測器資料時,使用者輸入的命令容易被捲動畫面淹沒。可設計 START、STOP 與 STATUS,讓使用者控制是否持續輸出。
bool streamEnabled = false;

if (strcmp(command, "START") == 0)
{
  streamEnabled = true;
  Serial.println(F("OK STREAM=ON"));
}
else if (strcmp(command, "STOP") == 0)
{
  streamEnabled = false;
  Serial.println(F("OK STREAM=OFF"));
}
建議統一使用 OK 與 ERROR 開頭的回覆,例如 OK LED=ON、ERROR UNKNOWN_COMMAND、ERROR INVALID_VALUE,方便人工與電腦程式判斷。
綜合實驗:序列控制與資料監測系統
此實驗整合 A0 類比輸入、D9 PWM LED、START/STOP 串流、AUTO/MANUAL 控制、BRIGHTNESS 參數與 DEBUG/CSV/PLOT 三種輸出模式。
| 命令 | 功能 |
|---|---|
| START | 開始週期輸出 |
| STOP | 停止週期輸出 |
| AUTO | LED 由 A0 自動控制 |
| MANUAL | 使用手動亮度 |
| BRIGHTNESS 0-255 | 設定手動亮度 |
| MODE DEBUG | 人類可讀輸出 |
| MODE CSV | CSV 輸出 |
| MODE PLOT | Plotter 輸出 |
| STATUS | 顯示目前狀態 |
| HELP | 顯示命令列表 |
#include <string.h>
#include <ctype.h>
#include <stdlib.h>

const int SENSOR_PIN = A0;
const int LED_PIN = 9;
const byte BUFFER_SIZE = 40;

char inputBuffer[BUFFER_SIZE];
byte inputIndex = 0;
bool discardInput = false;

enum ControlMode
{
  CONTROL_AUTO,
  CONTROL_MANUAL
};

enum OutputMode
{
  OUTPUT_DEBUG,
  OUTPUT_CSV,
  OUTPUT_PLOT
};

ControlMode controlMode = CONTROL_AUTO;
OutputMode outputMode = OUTPUT_DEBUG;

bool streamEnabled = false;
int adcValue = 0;
int pwmValue = 0;
int manualBrightness = 128;

unsigned long previousSampleMillis = 0;
unsigned long previousReportMillis = 0;
const unsigned long SAMPLE_INTERVAL = 20;
const unsigned long REPORT_INTERVAL = 200;

void setup()
{
  pinMode(LED_PIN, OUTPUT);
  Serial.begin(115200);
  printHelp();
}

void loop()
{
  readSerialInput();
  updateSensorAndLed();
  updateSerialReport();
}

void readSerialInput()
{
  while (Serial.available() > 0)
  {
    char receivedChar = Serial.read();

    if (receivedChar == '\r')
    {
      continue;
    }

    if (discardInput)
    {
      if (receivedChar == '\n')
      {
        discardInput = false;
        inputIndex = 0;
      }

      continue;
    }

    if (receivedChar == '\n')
    {
      inputBuffer[inputIndex] = '\0';
      convertToUpperCase(inputBuffer);
      processCommand(inputBuffer);
      inputIndex = 0;
      continue;
    }

    if (inputIndex < BUFFER_SIZE - 1)
    {
      inputBuffer[inputIndex++] = receivedChar;
    }
    else
    {
      discardInput = true;
      inputIndex = 0;
      Serial.println(F("ERROR COMMAND_TOO_LONG"));
    }
  }
}

void convertToUpperCase(char *text)
{
  for (byte index = 0; text[index] != '\0'; index++)
  {
    text[index] = static_cast<char>(
      toupper(static_cast<unsigned char>(text[index]))
    );
  }
}

void processCommand(char *commandLine)
{
  char *command = strtok(commandLine, " ");

  if (command == nullptr)
  {
    return;
  }

  if (strcmp(command, "START") == 0)
  {
    streamEnabled = true;
    Serial.println(F("OK STREAM=ON"));

    if (outputMode == OUTPUT_CSV)
    {
      Serial.println(F("time_ms,adc,voltage_v,pwm"));
    }
  }
  else if (strcmp(command, "STOP") == 0)
  {
    streamEnabled = false;
    Serial.println(F("OK STREAM=OFF"));
  }
  else if (strcmp(command, "AUTO") == 0)
  {
    controlMode = CONTROL_AUTO;
    Serial.println(F("OK CONTROL=AUTO"));
  }
  else if (strcmp(command, "MANUAL") == 0)
  {
    controlMode = CONTROL_MANUAL;
    Serial.println(F("OK CONTROL=MANUAL"));
  }
  else if (strcmp(command, "BRIGHTNESS") == 0)
  {
    char *argument = strtok(nullptr, " ");

    if (argument == nullptr)
    {
      Serial.println(F("ERROR MISSING_VALUE"));
      return;
    }

    char *endPointer;
    long value = strtol(argument, &endPointer, 10);

    if (*endPointer != '\0')
    {
      Serial.println(F("ERROR INVALID_NUMBER"));
      return;
    }

    if (strtok(nullptr, " ") != nullptr)
    {
      Serial.println(F("ERROR TOO_MANY_ARGUMENTS"));
      return;
    }

    if (value < 0 || value > 255)
    {
      Serial.println(F("ERROR RANGE_0_255"));
      return;
    }

    manualBrightness = static_cast<int>(value);
    controlMode = CONTROL_MANUAL;
    Serial.print(F("OK BRIGHTNESS="));
    Serial.println(manualBrightness);
  }
  else if (strcmp(command, "MODE") == 0)
  {
    char *argument = strtok(nullptr, " ");

    if (argument == nullptr)
    {
      Serial.println(F("ERROR MISSING_MODE"));
      return;
    }

    if (strtok(nullptr, " ") != nullptr)
    {
      Serial.println(F("ERROR TOO_MANY_ARGUMENTS"));
      return;
    }

    if (strcmp(argument, "DEBUG") == 0)
    {
      outputMode = OUTPUT_DEBUG;
      Serial.println(F("OK MODE=DEBUG"));
    }
    else if (strcmp(argument, "CSV") == 0)
    {
      outputMode = OUTPUT_CSV;
      Serial.println(F("OK MODE=CSV"));

      if (streamEnabled)
      {
        Serial.println(F("time_ms,adc,voltage_v,pwm"));
      }
    }
    else if (strcmp(argument, "PLOT") == 0)
    {
      outputMode = OUTPUT_PLOT;
      Serial.println(F("OK MODE=PLOT"));
    }
    else
    {
      Serial.println(F("ERROR INVALID_MODE"));
    }
  }
  else if (strcmp(command, "STATUS") == 0)
  {
    printStatus();
  }
  else if (strcmp(command, "HELP") == 0)
  {
    printHelp();
  }
  else
  {
    Serial.println(F("ERROR UNKNOWN_COMMAND"));
  }
}

void updateSensorAndLed()
{
  unsigned long currentMillis = millis();

  if (currentMillis - previousSampleMillis < SAMPLE_INTERVAL)
  {
    return;
  }

  previousSampleMillis += SAMPLE_INTERVAL;
  adcValue = analogRead(SENSOR_PIN);

  if (controlMode == CONTROL_AUTO)
  {
    pwmValue = map(adcValue, 0, 1023, 0, 255);
  }
  else
  {
    pwmValue = manualBrightness;
  }

  pwmValue = constrain(pwmValue, 0, 255);
  analogWrite(LED_PIN, pwmValue);
}

void updateSerialReport()
{
  if (!streamEnabled)
  {
    return;
  }

  unsigned long currentMillis = millis();

  if (currentMillis - previousReportMillis < REPORT_INTERVAL)
  {
    return;
  }

  previousReportMillis += REPORT_INTERVAL;
  printData();
}

void printData()
{
  float voltage = adcValue * 5.0 / 1023.0;

  if (outputMode == OUTPUT_DEBUG)
  {
    Serial.print(F("TIME="));
    Serial.print(millis());
    Serial.print(F(" ADC="));
    Serial.print(adcValue);
    Serial.print(F(" VOLTAGE="));
    Serial.print(voltage, 3);
    Serial.print(F("V PWM="));
    Serial.println(pwmValue);
  }
  else if (outputMode == OUTPUT_CSV)
  {
    Serial.print(millis());
    Serial.print(',');
    Serial.print(adcValue);
    Serial.print(',');
    Serial.print(voltage, 3);
    Serial.print(',');
    Serial.println(pwmValue);
  }
  else
  {
    Serial.print("ADC:");
    Serial.print(adcValue);
    Serial.print('\t');
    Serial.print("PWM_SCALED:");
    Serial.println(map(pwmValue, 0, 255, 0, 1023));
  }
}

void printStatus()
{
  Serial.print(F("STATUS STREAM="));
  Serial.print(streamEnabled ? F("ON") : F("OFF"));
  Serial.print(F(" CONTROL="));
  Serial.print(controlMode == CONTROL_AUTO ? F("AUTO") : F("MANUAL"));
  Serial.print(F(" ADC="));
  Serial.print(adcValue);
  Serial.print(F(" PWM="));
  Serial.println(pwmValue);
}

void printHelp()
{
  Serial.println(F("START"));
  Serial.println(F("STOP"));
  Serial.println(F("AUTO"));
  Serial.println(F("MANUAL"));
  Serial.println(F("BRIGHTNESS 0-255"));
  Serial.println(F("MODE DEBUG"));
  Serial.println(F("MODE CSV"));
  Serial.println(F("MODE PLOT"));
  Serial.println(F("STATUS"));
  Serial.println(F("HELP"));
}
Serial 資料可靠性與安全限制
UART Serial 通常不會自動提供封包重送、CRC、身份驗證、加密或完整性驗證。正式設備可依需求加入起始符號、結束符號、長度、Checksum、CRC、ACK/NACK、Timeout 與重送機制。
所有命令都應檢查長度、參數數量、數值範圍、不合法字元與 Buffer Overflow。高功率馬達、加熱器、雷射、高電壓設備或工業致動器,不可只依靠 STOP 文字命令作為唯一安全機制。
- 配置實體急停按鍵或硬體斷電。
- 使用 Watchdog、安全繼電器與限位開關。
- 設定通訊 Timeout 與預設安全狀態。
- 將 Serial Monitor 視為測試介面,而不是取代必要的硬體安全設計。
Serial 除錯可能改變程式時序
加入 Serial.println() 可能改變程式速度、中斷時序、競爭條件與 Buffer 行為。有些原本會發生的錯誤,加入輸出後反而暫時消失,這類問題常被稱為 Heisenbug。
高速程式可改用只在錯誤時輸出、降低輸出頻率、先存入陣列再批次輸出、GPIO Toggle 搭配示波器、邏輯分析儀或硬體除錯器。
常見錯誤與故障排除
| 問題 | 原因與處理 |
|---|---|
| 畫面出現亂碼 | Arduino 與 Serial Monitor 的 Baud Rate 不一致。 |
| 沒有任何輸出 | 可能忘記在 setup() 中呼叫 Serial.begin(),或選錯序列埠。 |
| 輸入 5 卻得到 53 | 收到的是字元 '5' 的 ASCII 值,不是整數 5。 |
| 命令多出 Unknown Command | 未處理 \r 與 \n。 |
| C 字串比較失敗 | 應使用 strcmp(),不可使用 == 比較內容。 |
| 程式變慢或卡住 | loop() 過度輸出或傳送 Buffer 塞滿。 |
| Serial.flush() 無法清除輸入 | 它通常是等待傳送完成,不是清除接收 Buffer。 |
| 外部模組干擾上傳 | D0、D1 與 USB Serial 共用硬體 UART。 |
| Plotter 無法繪圖 | 輸出混入文字、欄位數不一致或格式不受目前 IDE 版本支援。 |
| 程式在 parseInt() 暫停 | 解析函式可能等待 Timeout。 |
| ISR 中使用 Serial 出現異常 | ISR 不應進行大量 Serial 輸出,應設定旗標後由 loop() 處理。 |
本章實作練習
- 使用 millis() 每 500 ms 顯示 A0 讀值,不使用 delay()。
- 將 ADC 換算成電壓,保留兩位小數並顯示單位。
- 將 byte value = 170 以 DEC、HEX 與補足 8 位元的 BIN 顯示。
- 使用 1、0、t、s 控制 LED,並忽略 \r、\n。
- 使用固定 char Buffer 支援 ON、OFF、TOGGLE、STATUS、HELP。
- 建立 PWM 0-255 命令,檢查缺少參數、無效整數與範圍錯誤。
- 每 100 ms 輸出 time_ms、adc、voltage_v CSV。
- 在 Serial Plotter 同時顯示原始 ADC、10 筆移動平均、下限 0 與上限 1023。
- 加入 START、STOP 與 MODE DEBUG/CSV/PLOT。
本章重點整理
- Serial Monitor 適合文字訊息、命令與除錯;Serial Plotter 適合波形與趨勢。
- Arduino 與電腦端 Baud Rate 必須一致。
- Serial.print() 不換行,Serial.println() 會換行。
- Serial.available() 檢查接收 Buffer,Serial.read() 每次讀取一個 Byte。
- 字元 '5'、ASCII 53 與整數 5 是不同資料。
- 完整命令應使用有限長度 Buffer,並處理 \r、\n 與 \0。
- C 字串使用 strcmp() 比較,數值參數可用 strtol() 驗證。
- 不要在每次 loop() 無限制輸出,也不要在 ISR 中大量使用 Serial。
- Debug、CSV 與 Plot 模式應使用一致且適合目的的格式。
- 取樣與序列輸出應盡量分離,並留意 Serial 除錯對即時性的影響。
- 高風險設備必須具備獨立硬體安全機制。
下一章預告
下一章將介紹 Arduino Debug 方法與系統化故障排除,包括編譯、連結、上傳與執行錯誤的分類,以及使用 Serial Monitor、LED、萬用電表、示波器與邏輯分析儀建立可重複的診斷流程。